In the kitchen vacuum forming Instructable I describe how to make aluminum plastic clamping frames from window screen frame material. Those frames are nice because they're easy to make, and you can mix and match side lengths to get various sizes and aspect ratios for different projects.
Aluminum window screen frame material is a bit flimsy, however, so if you're making big stuff or using really thick plastic, you may want something more rigid.
Aluminum C-channel is a good choice, too. You can find it in several sizes and a couple of thicknesses at a home improvement store like Home Depot or Lowe's.
This is a small (12 x 18") frame made of small C-channel (3/8", 1/16" or 1/20" thick), but the same technique works for larger frames made of correspondingly larger and thicker C-channel.
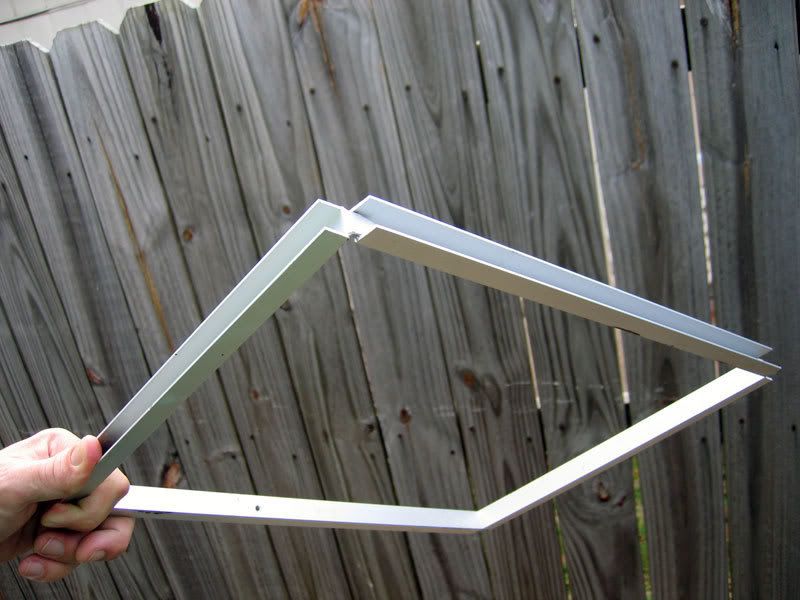
The basic technique is just to cut slits in the horizontal parts of the C profile with a hacksaw, and bend the vertical part to make the corners. (Be careful not to score the vertical part while sawing through the horizontals, or it may tear there.)
Where the C-channel comes back and meets itself, there's a little extra piece with the horizontals cut off, to make a tab.
The tab is also bent at 90 degrees, to overlap the vertical at the other end. Both are drilled, and pop-riveted together. (Or you could use a small bolt.)
For thicker material than I used here, such as 1/8" aluminum, it's also a good idea to drill 1/4" holes through the horizontals right next to the vertical part, and saw the slit until it meets that hole. (That takes away horizontal material near the bend point, so that it can bend over a slighly larger radius, and not fracture.)
Rigidity of a solid is generally proportional to the cube of the thickness, so one frame twice as thick is 8 times as rigid. (Or 4 times as rigid as two frames.) 3/8" thick C-channel is considerably more rigid than window screen frame stuff, and 3/4" C-channel is way, way more rigid.
You only need one frame that's pretty rigid. The other one only needs to be rigid enough to spread a fair bit of the clamping force halfway from one clamp to the next.
To maximize rigidity for a given cost, you should generally combine one thick, rigid frame with a thinner, more flexible one.
(Even if the cost of the frame material is no object, that's usually a good idea, at least for metal frames. Metal frames act as heat sinks and make it harder to heat the edges of the plastic, or take longer to preheat the frames. Minimizing the amount of metal needed to get the necessary rigidity is usually a good idea.)
So, for example, you might make one frame out of 3/4" C-channel 1/8" thick, for overall rigidity, and another out of 1/4" C-channel 1/16" thick. That will be stiffer than a pair of frames made out of 1/2" C-channel.
Making the top and bottom frames different also gives you some interesting choices. You can have one frame that's rigid along the sides, and another that's fairly flexible along the sides but has rigid corners. Once you clamp them together, they'll be fairly rigid all around.
One version of that would be to make a main frame out of 3/4" or 1" C-channel, with the horizontal parts cut to let you bend the vertical parts. That gives you rigid bars but not very rigid corners. You can combine that with a matching frame made out of aluminum windowscreen stuff, which is flimsy (and inexpensive) but has rigid right-angle corners. Between the two of them, you get rigid bars and fairly rigid corners, with no welding or brazing.
(There's a gotcha here, though, if you're using a platen with a gasket; I'll explain that below. The frames shown were made for a platen whose edge seals directly to the hot plastic, so that the rubbery plastic acts as its own gasket. If you don't know what that means, and you're curious, check out the "Platen Design and Construction" link in the sidebar.)
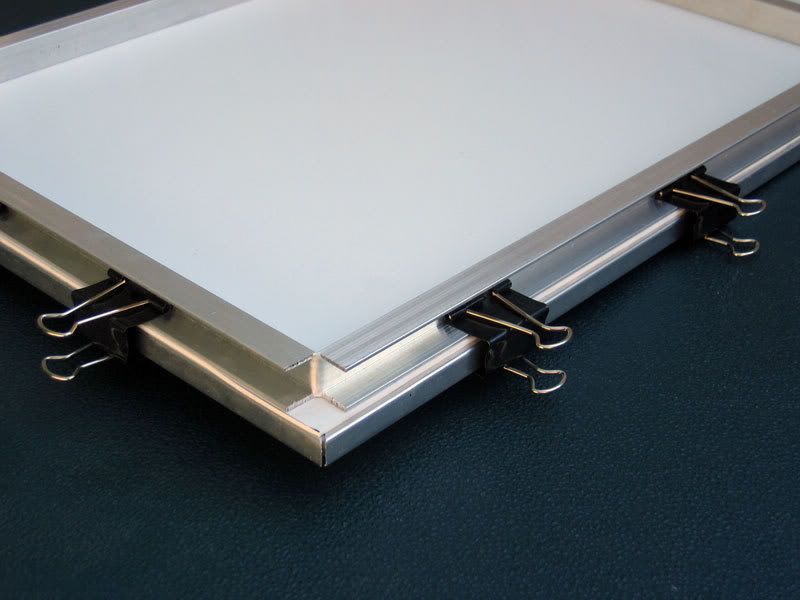
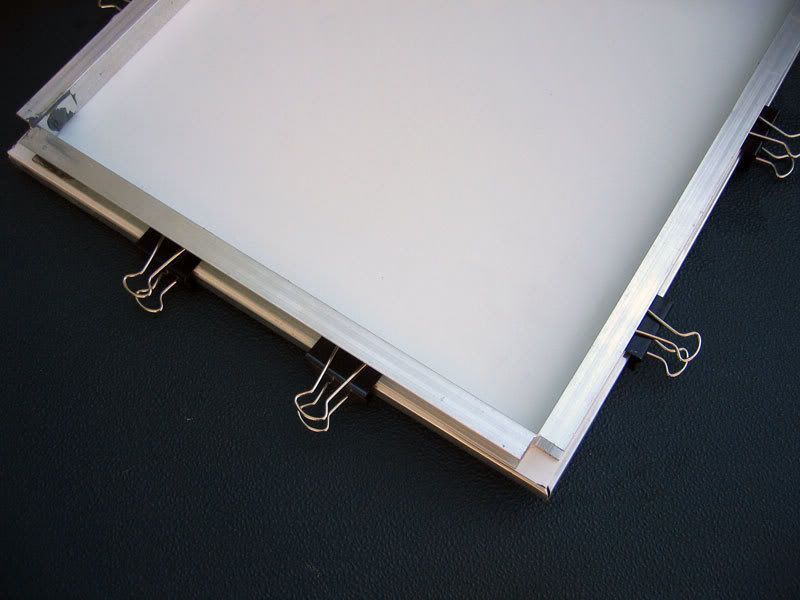
Here's an example of that, with a small frame made of 3/8" C-Channel paired with a window screen-type frame, clamped around a piece of plastic:
The same scheme would work with a much larger frame made of, say, 3/4" C-channel made of 1/8" aluminum. The other frame could still be made of window screen frame stuff; as long as you have clamps every few inches, it's rigid enough to hold the plastic against the more rigid frame.
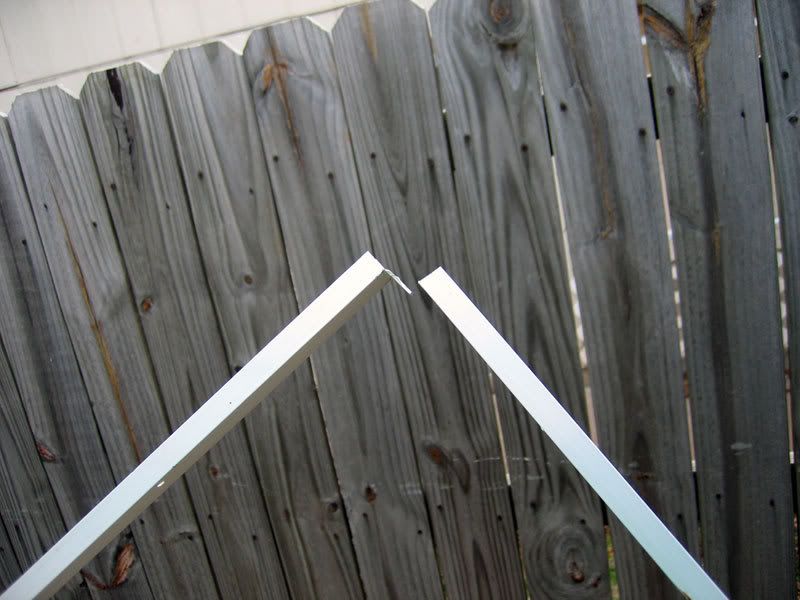
Here's a shot where you can see the tab riveted in place to close the rectangle:
I epoxied the joint (and the hole through the rivet) with J. B. Weld to make it air tight there in case I used that frame with a gasket system. (It was built for an direct edge-sealing platen with no gasket.)
The gotcha with mixing C-channel frames and window screen frames is that the positioning of the clamps (binder clips) can interfere with the gasket seal. With two C-channel frames, the clamps can go inside the C's of both frames, and the bottom of the bottom frame is left flat to seal against the gasket. With two windowscreen frames, you can just put the binder clip around both frames, with the rolled edge extending inward past the frames to clear the gasket and leave the bottom flat where it meets the gasket. But with one frame of each type, you can't really do either---if one edge your clip goes inside the C channel, that stops it from moving inward further than the frame, and the rolled edge on the other side is stuck against the window screen frame where it meets the gasket. Oops.
So if you mix the two, the C-channel frame has to go on bottom, because the binder clip can go inside it and not mess up the seal. That may not be what you want, if you're using C-channel to make a thick, rigid frame. (Generally you'd like the thinner frame on bottom, so that it doesn't raise the edges of the plastic way above the platen.) In that case, you may be better off with two C-channel frames, with big C-channel for the top frame, and small for the bottom one.
To get good corner rigidity using only C-channel, you can attach flat L-shaped angle braces to the top horizontal parts of the top frame. (That's one advantage of C-channel over L-profile aluminum---the upper surface of the top frame can have something riveted or bolted to it without interfering with the surface that meets the plastic.) A couple of L-braces on diagonally opposed corners makes the frame almost as rigid as braces on all four corners.
Some tips on cutting, bending, and drilling the aluminum:
1. Use a hacksaw, and a miter box if you have one, to get the two slits aligned at each bend. Disaligned slits may make it prone to bending out of a plane and making a warped frame.
2. Be careful not to score the vertical part when you cut the horizontal parts.
3. For thicker material than I used here, such as 1/8" aluminum, it's also a good idea to drill 1/4" holes through the horizontals right next to the vertical part, and saw the slit until it meets that hole. (That takes away horizontal material near the bend point, so that it can bend over a slighly larger radius, and not fracture. It also makes it easier to cut through the horizontals without going so far as to score the vertical. I got this tip from Doug Walsh's excellent book, Do it Yourself Vacuum Forming for the Hobbyist, where he applies it to similar frames made of L-profile aluminum.)
3. For drilling, start by making a pilot dent with a punch or a hammer and a nail, then drill a small pilot hole, then the 1/4" hole. Don't try to drill a 1/4" hole without a pilot hole.
4. While drilling metal, use a slow speed and go slow. Spinning the bit too fast just generates extra heat from friction. Frequently pull the bit up and blow the chips out. (Aluminum is not very hard to drill, but this is good advice anyway.)
5. When bending the corners, do it against something flat, and sweep one side slowly through 90 degrees. (I did it against my glass patio door.)
EDIT 10 Sept. 07:
Hmmm... it seems that C-channel frames are also in Doug's book. Yet another Walsh wheel I've reinvented.
I've also come across a commercial vacuum former using this kind of frame, with L-shaped braces riveted to cut-and-bent C-channel to make the corners rigid.